


一、需求
创建一个简单的web页面,需要实现以下功能:
1.能够CURD mysql8.0数据库
2.能够显示日志。
二、项目设置
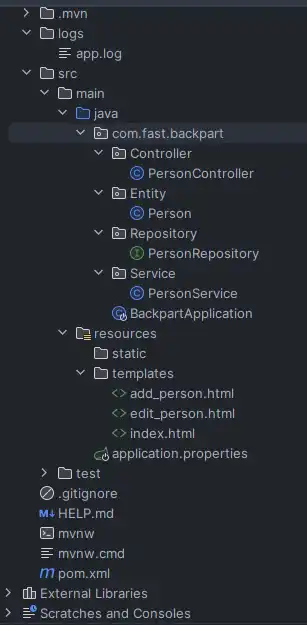
项目整体结构如下所示:
1.创建一个新的Spring Boot项目
你可以使用Spring Initializr(https://start.spring.io/)来生成项目,选择以下配置:
Project: Maven Project
Language: Java
Spring Boot: 2.7.0 (或最新版本)
Packaging: Jar
Java: 17
Dependencies:
Spring Web
Spring Data JPA
MySQL Driver
Thymeleaf
Spring Boot DevTools
2.配置依赖:`pom.xml`
<?xml version="1.0" encoding="UTF-8"?>
<project xmlns="http://maven.apache.org/POM/4.0.0" xmlns:xsi="http://www.w3.org/2001/XMLSchema-instance"
         xsi:schemaLocation="http://maven.apache.org/POM/4.0.0 https://maven.apache.org/xsd/maven-4.0.0.xsd">
    <modelVersion>4.0.0</modelVersion>
    <parent>
        <groupId>org.springframework.boot</groupId>
        <artifactId>spring-boot-starter-parent</artifactId>
        <version>3.3.2</version>
        <relativePath/> <!-- lookup parent from repository -->
    </parent>
    <groupId>com.fast</groupId>
    <artifactId>backpart</artifactId>
    <version>0.0.1-SNAPSHOT</version>
    <name>backpart</name>
    <description>backpart</description>
    <url/>
    <licenses>
        <license/>
    </licenses>
    <developers>
        <developer/>
    </developers>
    <scm>
        <connection/>
        <developerConnection/>
        <tag/>
        <url/>
    </scm>
    <properties>
        <java.version>17</java.version>
    </properties>
    <dependencies>
        <dependency>
            <groupId>org.springframework.boot</groupId>
            <artifactId>spring-boot-starter-web</artifactId>
        </dependency>

        <dependency>
            <groupId>org.springframework.boot</groupId>
            <artifactId>spring-boot-starter-test</artifactId>
            <scope>test</scope>
        </dependency>
        <dependency>
            <groupId>org.springframework.boot</groupId>
            <artifactId>spring-boot-starter-data-jpa</artifactId>
        </dependency>
        <dependency>
            <groupId>org.springframework.boot</groupId>
            <artifactId>spring-boot-starter-thymeleaf</artifactId>
        </dependency>
        <dependency>
            <groupId>org.springframework.boot</groupId>
            <artifactId>spring-boot-starter-logging</artifactId>
        </dependency>
        <dependency>
            <groupId>org.springframework.boot</groupId>
            <artifactId>spring-boot-devtools</artifactId>
            <scope>runtime</scope>
            <optional>true</optional>
        </dependency>
        <dependency>
            <groupId>mysql</groupId>
            <artifactId>mysql-connector-java</artifactId>
            <version>8.0.28</version>
        </dependency>

    </dependencies>

    <build>
        <plugins>
            <plugin>
                <groupId>org.springframework.boot</groupId>
                <artifactId>spring-boot-maven-plugin</artifactId>
            </plugin>
        </plugins>
    </build>
</project>
3.配置 application.properties
在 src/main/resources/application.properties 文件中,配置你的MySQL数据库连接:
spring.datasource.url=jdbc:mysql://localhost:3306/your_database_name?useSSL=false&serverTimezone=UTC
spring.datasource.username=your_username
spring.datasource.password=your_password
spring.datasource.driver-class-name=com.mysql.cj.jdbc.Driver

spring.jpa.hibernate.ddl-auto=update
spring.jpa.show-sql=true

logging.level.org.springframework=INFO
logging.file.name=logs/app.log
4.创建实体类
在 src/main/java/com/fast/backpart/Entity/ 目录下创建一个实体类 Person:
package com.fast.backpart.Entity;
import jakarta.persistence.Entity;
import jakarta.persistence.GeneratedValue;
import jakarta.persistence.GenerationType;
import jakarta.persistence.Id;


@Entity
public class Person {
    @Id
    @GeneratedValue(strategy = GenerationType.IDENTITY)
    public Long getId() {
        return id;
    }

    public void setId(Long id) {
        this.id = id;
    }

    public String getName() {
        return name;
    }

    public void setName(String name) {
        this.name = name;
    }

    public String getEmail() {
        return email;
    }

    public void setEmail(String email) {
        this.email = email;
    }

    private Long id;

    private String name;
    private String email;
}
5. 创建存储库接口
在 src/main/java/com/fast/backpart/Repository/ 目录下创建一个存储库接口 PersonRepository:
package com.fast.backpart.Repository;
import com.fast.backpart.Entity.Person;
import org.springframework.data.jpa.repository.JpaRepository;

public interface PersonRepository extends JpaRepository<Person, Long>{
}
6. 创建服务类
在 src/main/java/com/fast/backpart/Service/ 目录下创建一个服务类 PersonService:
package com.fast.backpart.Service;

import com.fast.backpart.Entity.Person;
import com.fast.backpart.Repository.PersonRepository;
import org.springframework.beans.factory.annotation.Autowired;
import org.springframework.stereotype.Service;

import java.util.List;


@Service
public class PersonService {
    @Autowired
    private PersonRepository personRepository;

    public List<Person> getAllPersons() {
        return personRepository.findAll();
    }

    public Person getPersonById(Long id) {
        return personRepository.findById(id).orElse(null);
    }

    public Person createPerson(Person person) {
        return personRepository.save(person);
    }

    public Person updatePerson(Long id, Person personDetails) {
        Person person = personRepository.findById(id).orElse(null);
        if (person != null) {
            person.setName(personDetails.getName());
            person.setEmail(personDetails.getEmail());
            return personRepository.save(person);
        }
        return null;
    }

    public void deletePerson(Long id) {
        personRepository.deleteById(id);
    }
}
7. 创建控制器类
在 src/main/java/com/fast/backpart/Controller/ 目录下创建一个控制器类 PersonController:
package com.fast.backpart.Controller;

import com.fast.backpart.Entity.Person;
import com.fast.backpart.Service.PersonService;
import org.springframework.beans.factory.annotation.Autowired;
import org.springframework.stereotype.Controller;
import org.springframework.web.bind.annotation.GetMapping;
import org.springframework.web.bind.annotation.ModelAttribute;
import org.springframework.web.bind.annotation.PathVariable;
import org.springframework.web.bind.annotation.PostMapping;
import org.springframework.ui.Model;

import java.util.List;

/**
 * @author LHP
 * @date 2024/07/26 13:54
 **/
@Controller
public class PersonController {
    @Autowired
    private PersonService personService;

    @GetMapping("/")
    public String viewHomePage(Model model) {
        List<Person> personList = personService.getAllPersons();
        model.addAttribute("persons", personList);
        return "index";
    }

    @GetMapping("/add")
    public String addPersonForm(Model model) {
        model.addAttribute("person", new Person());
        return "add_person";
    }

    @PostMapping("/add")
    public String addPerson(@ModelAttribute Person person) {
        personService.createPerson(person);
        return "redirect:/";
    }

    @GetMapping("/edit/{id}")
    public String editPersonForm(@PathVariable Long id, Model model) {
        Person person = personService.getPersonById(id);
        model.addAttribute("person", person);
        return "edit_person";
    }

    @PostMapping("/update/{id}")
    public String updatePerson(@PathVariable Long id, @ModelAttribute Person person) {
        personService.updatePerson(id, person);
        return "redirect:/";
    }

    @GetMapping("/delete/{id}")
    public String deletePerson(@PathVariable Long id) {
        personService.deletePerson(id);
        return "redirect:/";
    }
}
8. 创建前端模板
在 src/main/resources/templates/ 目录下创建以下HTML模板文件:
index.html
<!DOCTYPE html>
<html xmlns:th="http://www.thymeleaf.org">
<head>
    <title>Person Management</title>
</head>
<body>
<h1>Person Management</h1>
<a href="/add">Add New Person</a>
<table border="1">
    <tr>
        <th>ID</th>
        <th>Name</th>
        <th>Email</th>
        <th>Actions</th>
    </tr>
    <tr th:each="person : ${persons}">
        <td th:text="${person.id}"></td>
        <td th:text="${person.name}"></td>
        <td th:text="${person.email}"></td>
        <td>
            <a th:href="@{/edit/{id}(id=${person.id})}">Edit</a>
            <a th:href="@{/delete/{id}(id=${person.id})}">Delete</a>
        </td>
    </tr>
</table>
</body>
</html>
add_person.html
<!DOCTYPE html>
<html xmlns:th="http://www.thymeleaf.org">
<head>
    <title>Add Person</title>
</head>
<body>
<h1>Add Person</h1>
<form action="#" th:action="@{/add}" th:object="${person}" method="post">
    <label for="name">Name:</label>
    <input type="text" id="name" th:field="*{name}" />
    <br>
    <label for="email">Email:</label>
    <input type="text" id="email" th:field="*{email}" />
    <br>
    <button type="submit">Save</button>
</form>
</body>
</html>`edit_person.html
<!DOCTYPE html>
<html xmlns:th="http://www.thymeleaf.org">
<head>
    <title>Edit Person</title>
</head>
<body>
<h1>Edit Person</h1>
<form action="#" th:action="@{/update/{id}(id=${person.id})}" th:object="${person}" method="post">
    <label for="name">Name:</label>
    <input type="text" id="name" th:field="*{name}" />
    <br>
    <label for="email">Email:</label>
    <input type="text" id="email" th:field="*{email}" />
    <br>
    <button type="submit">Save</button>
</form>
</body>
</html>
9. 运行应用程序
现在,运行你的Spring Boot应用程序,使用以下命令:
mvn spring-boot:run访问 http://localhost:8080 可以看到CRUD界面。
10. 查看日志
应用程序的日志将被写入 logs/app.log 文件,你可以在该文件中查看所有的日志记录。
评论区